

Prerequisites #
| Item | Price |
|---|---|
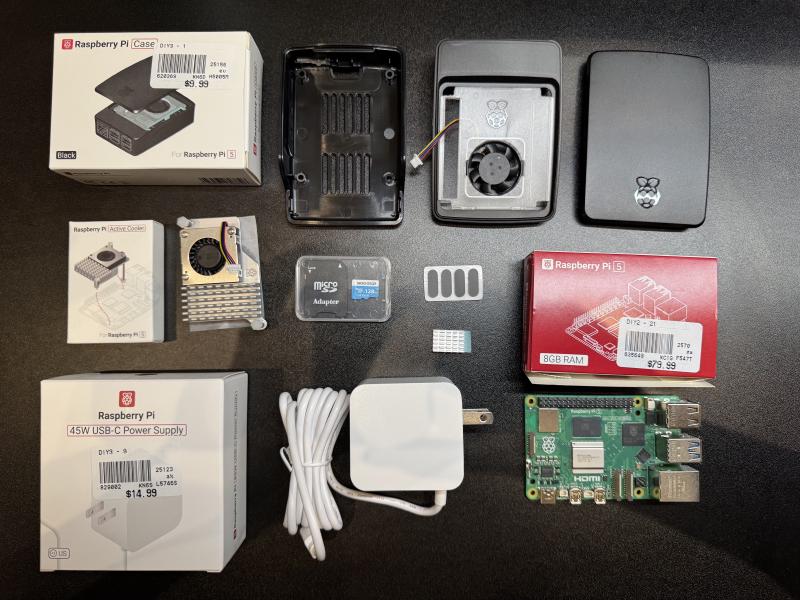
| Raspberry Pi 5 8 GB | $79.99 |
| 128GB Micro SD Card | $0.01 |
| Raspberry Pi Active Cooler | $7.99 |
| Raspberry Pi 5 Case Black | $9.99 |
| Raspberry Pi 45W USB-C Power Supply | $14.99 |
| Gourmet I Pocky Green Tea | $2.99 |
| Tax | $6.96 |
| Total | $122.92 |
Here is a list of all the things I bought. All of these besides the case is pretty much required to have. Assembly is pretty easy. If you’ve ever built a lego set in your life no instructions are needed.
Step 1: Set Up Raspberry Pi #
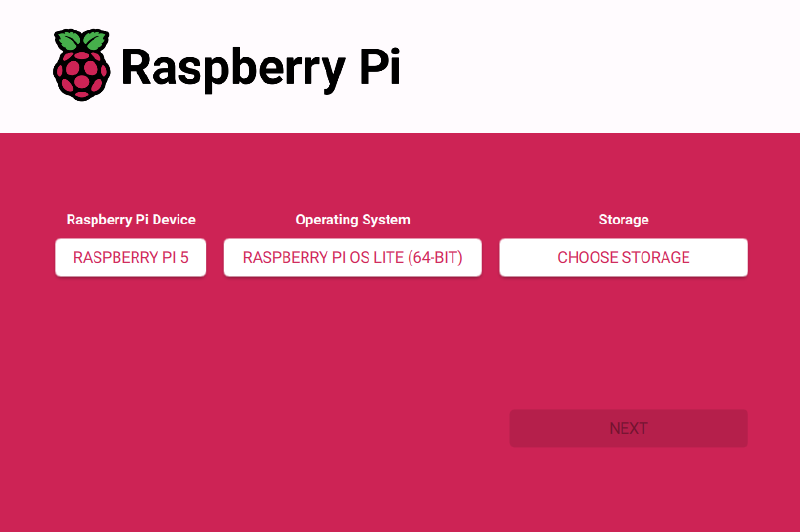
1.1 Flash the OS #
- On a main computer, download the Raspberry Pi Imager.
- Choose:
- OS: Raspberry PI OS Lite (64-bit)
- Storage: Your SD card
- Enable SSH:
- Click (settings) and enabled SSH and set username/password
- Flash and insert into Raspberry Pi
- Set up Wifi (or you can use ethernet)
1.2 First Boot & Updates #
- On another device, lets call this Main Computer, SSH into your Pi
ssh [email protected]
# enter your password- After you’ve successfully SSHed into the Pi
sudo apt update && sudo apt full-upgrade -y
sudo apt install git curl -y
Step 2: Install Docker & Docker Compose #
curl -fsSL https://get.docker.com -o get-docker.sh
sudo sh get-docker.sh
sudo usermod -aG docker $USER
#logout and back in, then install Docker Compose
sudo apt install docker-compose -y
Step 3: Set Up Nginx Proxy Manager (NPM) #
3.1 Create Docker Compose File #
- We will be following this guide here: Nginx Proxy Manager Guide.
mkdir ~/nginx-proxy-manager && cd ~/nginx-proxy-manager
#I'm a big vi fan but you can use nano (you have have to install vi)
vi docker-compose.yml- Paste this into docker-compose.yml
services:
  app:
    image: 'jc21/nginx-proxy-manager:latest'
    restart: unless-stopped
    ports:
      - '80:80'
      - '81:81'
      - '443:443'
    volumes:
      - ./data:/data
      - ./letsencrypt:/etc/letsencrypt
3.2 Run NPM #
docker-compose up -d- You need your PI IP Address.
hostname -I - You should now be able to access it via you Main Computer
http://<your-pi-ip>:81
- Default login is:
Email: admin@example.com
Password: changeme
Step 4: Set Up VaultWarden #
Create Folder and Compose File #
- Back on the terminal for your Pi. Go back to your root folder
mkdir ~/vaultwarden && cd ~/vaultwarden
vi docker-compose.ymlservices:
vaultwarden:
image: vaultwarden/server:latest
container_name: vaultwarden
restart: unless-stopped
environment:
DOMAIN: "https://vault.yourdomain.com"
volumes:
- ./vw-data/:/data/
ports:
- 80:80docker-compose up -dStep 5: Connect Domain with Cloudflare #
5.1 Add your Domain To Cloudflare #
- Go to Cloudflare Dashboard.
- Add your domain and change your registrar’s nameservers to Cloudflare’s
5.2 Create A Record #
- Go to DNS > Add Record:
- Type: A
- Name: vault (ie. vault.yourdomain.com)
- Conect: Your home’s public IP
- TTL: Auto
- Proxy: Enabled
Step 6: Configure Port Forwarding #
- In your router settings:
- Forward port 80 and 443 to your Pi’s IP
Step 7: Use Nginx Proxy Manager to Set SSL #
- Go to NPM UI https://
:81 - Click Proxy Hosts > Add Proxy Host
- Domain: vault.yourdomain.com
- Forward Hostanme/IP: vaultwarden
- Forward Port: 80
- Block common Exploits: on
- Websockets: on
- SSL Tab:
- Request SSL Certificate (Let’s Encrypt)
- Force SSL: on
- Save
Step 8: Test #
- Go to https://vault.yourdomain.com
- You should see the Vaultwarden login page secured with HTTPS!